Outline:
1. Deployment on Google Cloud Platform
The modularized scripts after testing need to be deployed on Google Cloud for automatic training as well as online prediction.
1.1 Initial Google Cloud Configuration
1.1.1 Setup for Google Cloud:
- Goto IAM & Admin > service accounts and create a service account with the following roles:
- Storage Admin
- Vertex AI Admin
- AI Platform Admin
- Artifact Registry Administrator
- Service Account Admin
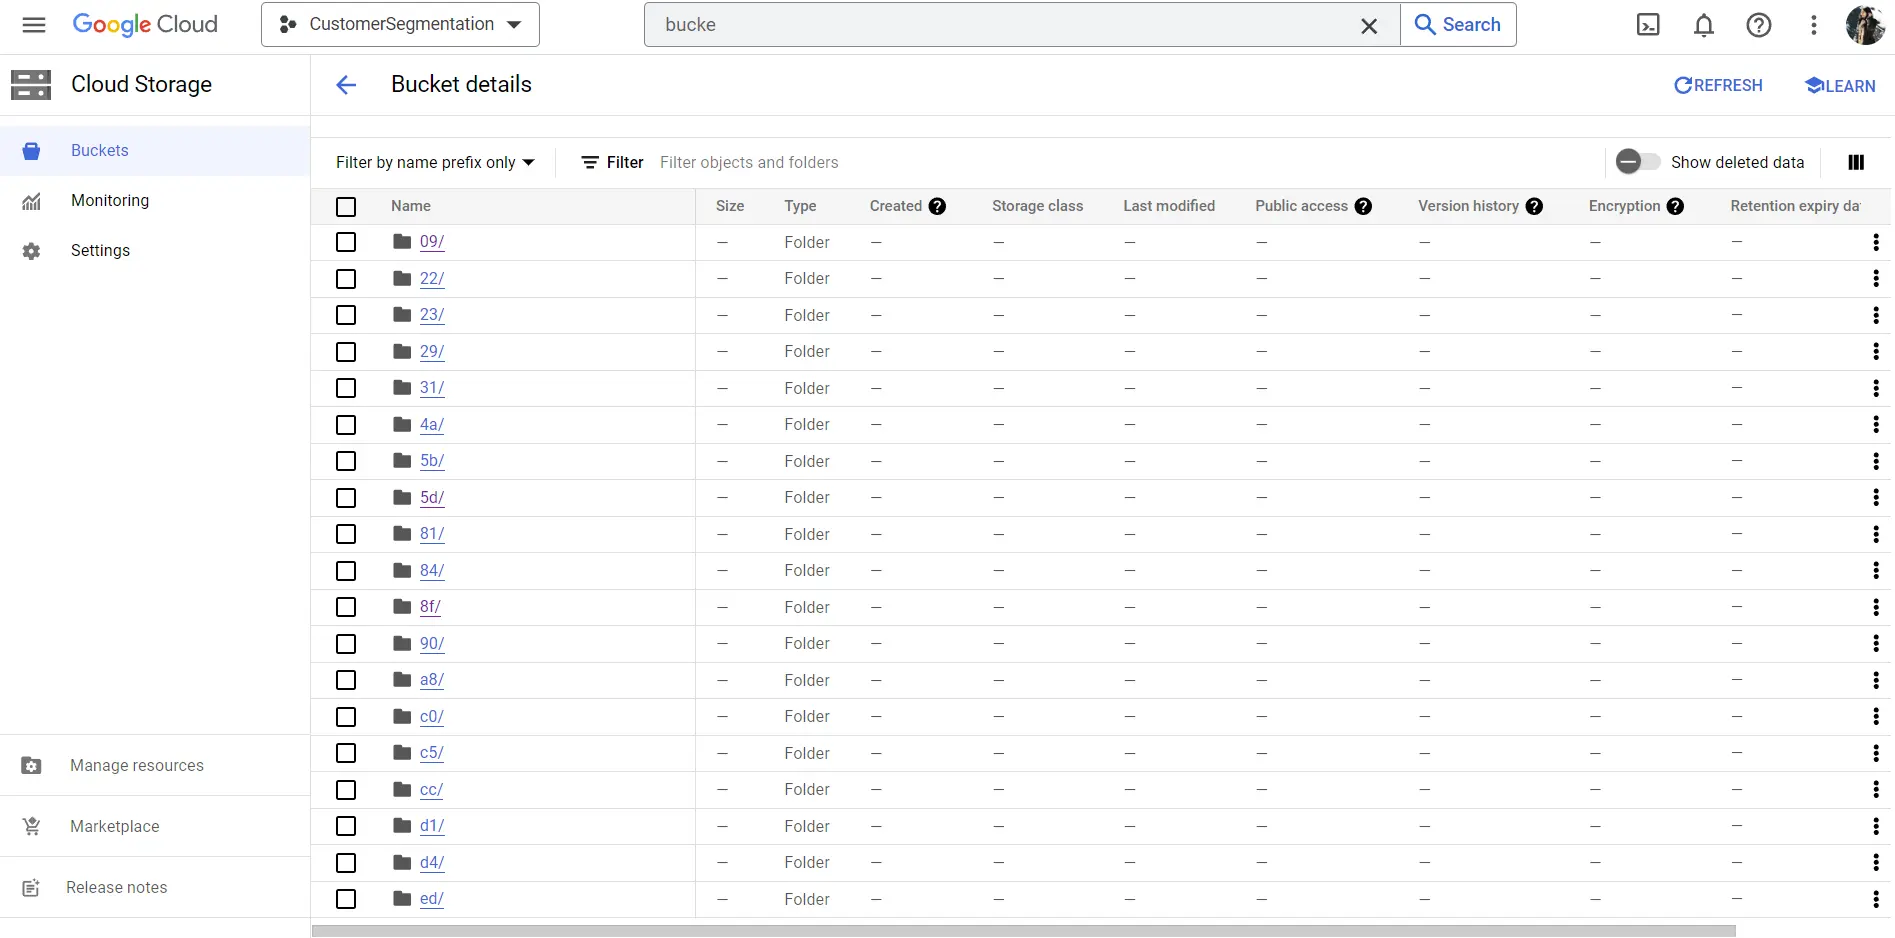
- Create a separate bucket, if required, for model training and serving instance by:
- Navigate to Google Cloud Console. Ensure you have created a new project or are under the correct project.
- Select Cloud Storage > Buckets. Choose an existing bucket and skip steps 3-7, or create a new bucket, as required.
- Assign a unique bucket-name. Choose region from the drop down list. Note: Separate regions may have different billing rates, so choose accordingly.
- Proceed by clicking “Continue” until your new bucket is successfully created.
- Go to the Google Cloud Console. Navigate to APIs & Services > Library. Search for and enable the Container Registry API and the Vertex AI API.
- Install and initialize the Google Cloud CLI on your local device to authenticate and interact with Google Cloud services from the command line.
gcloud auth login gcloud config set project [YOUR_PROJECT_ID] - Configure Docker to use the gcloud command-line tool as a credential helper:
gcloud auth configure-docker us-east1-docker.pkg.dev - Run the following command to authorize GCP at command line. Replace service_account.json with the name of the json file you downloaded.
gcloud auth activate-service-account --key-file=service_account.json
1.1.2 Setup for enviroment:
Create a .env file in the root of your project directory with the following content. This file should not be
committed to your version control system so add it to your .gitignore file. This file will be used to store the
environment variables used in the project. You can change the values of the variables as per your
requirements.
Note: [YOUR_PROJECT_ID] should be the name of your GCP project ID, [FOLDER_NAME] should be the name of the
folder in which you want to store the docker images in the Artifact Registry.
[YOUR_SERVICE_ACCOUNT_EMAIL] should be the email address of the service account you created.
    # Google Cloud Storage bucket name
    BUCKET_NAME= [YOUR_BUCKET]

    # Google Cloud Storage bucket directory for storing the data
    BASE_OUTPUT_DIR=gs://[YOUR_BUCKET]

    # Google Cloud AI Platform model directory
    AIP_MODEL_DIR=gs://[YOUR_BUCKET]/model

    # Google Cloud region
    REGION=us-east1

    # Google Cloud project ID
    PROJECT_ID=[YOUR_PROJECT_ID]

    # Container URI for training
    CONTAINER_URI=us-east1-docker.pkg.dev/[YOUR_PROJECT_ID]/[FOLDER_NAME]/trainer:v1

    # Container URI for model serving
    MODEL_SERVING_CONTAINER_IMAGE_URI=us-east1-docker.pkg.dev/YOUR_PROJECT_ID/[FOLDER_NAME]/serve:v1

    # Health check route for the AI Platform model
    AIP_HEALTH_ROUTE=/ping

    # Prediction route for the AI Platform model
    AIP_PREDICT_ROUTE=/predict

    # Service account key file path
    SERVICE_ACCOUNT_EMAIL= [YOUR_SERVICE_ACCOUNT_EMAIL]
1.2 Training Scripts
The model is trained using K-Means_Clustering function. It takes 3 inputs and gives 2 outputs. The three inputs are PCA dataframe, transaction dataframe and number of clusters. The outputs are PCA dataframe and transaction dataframe with ‘cluster’ columns.
We have made a separate folder that contains the main and supporting scripts for training with functionalities are as given below:
ClusterBasedRecommender.py: It contains K-Means_Clustering algorithm, removing_outliers and hyper parameter tuning.train.py: Creates the model and saves it on Google Cloud after using the train data from Google Cloud.Dockerfile: Used to host the training module.
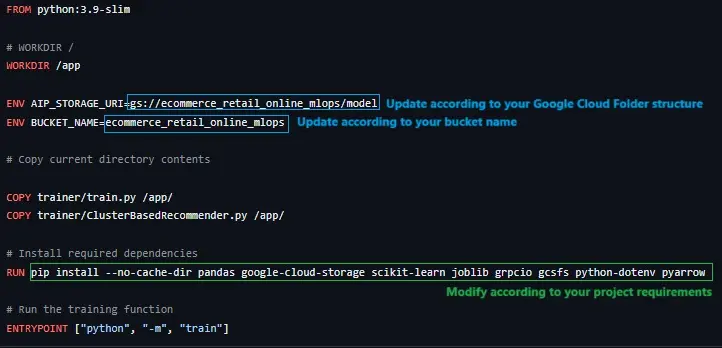
1.2.1 Setup for Training:
The Dockerfile for creating image for Training needs to be updated:
1.3 Serving Scripts
The main and supporting scripts for Serving with functionalities are as given below:
predict.py: The flask app to predict clusters based on input json data.Dockerfile: Used to host the serving module.
1.3.1 Setup for Serving:
The Dockerfile for creating image for Serving needs to be updated:
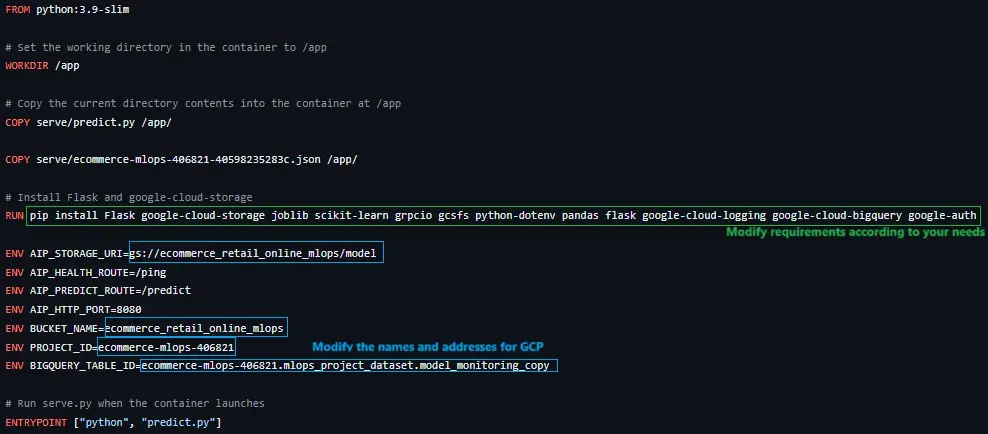
Image: Model Training and Serving
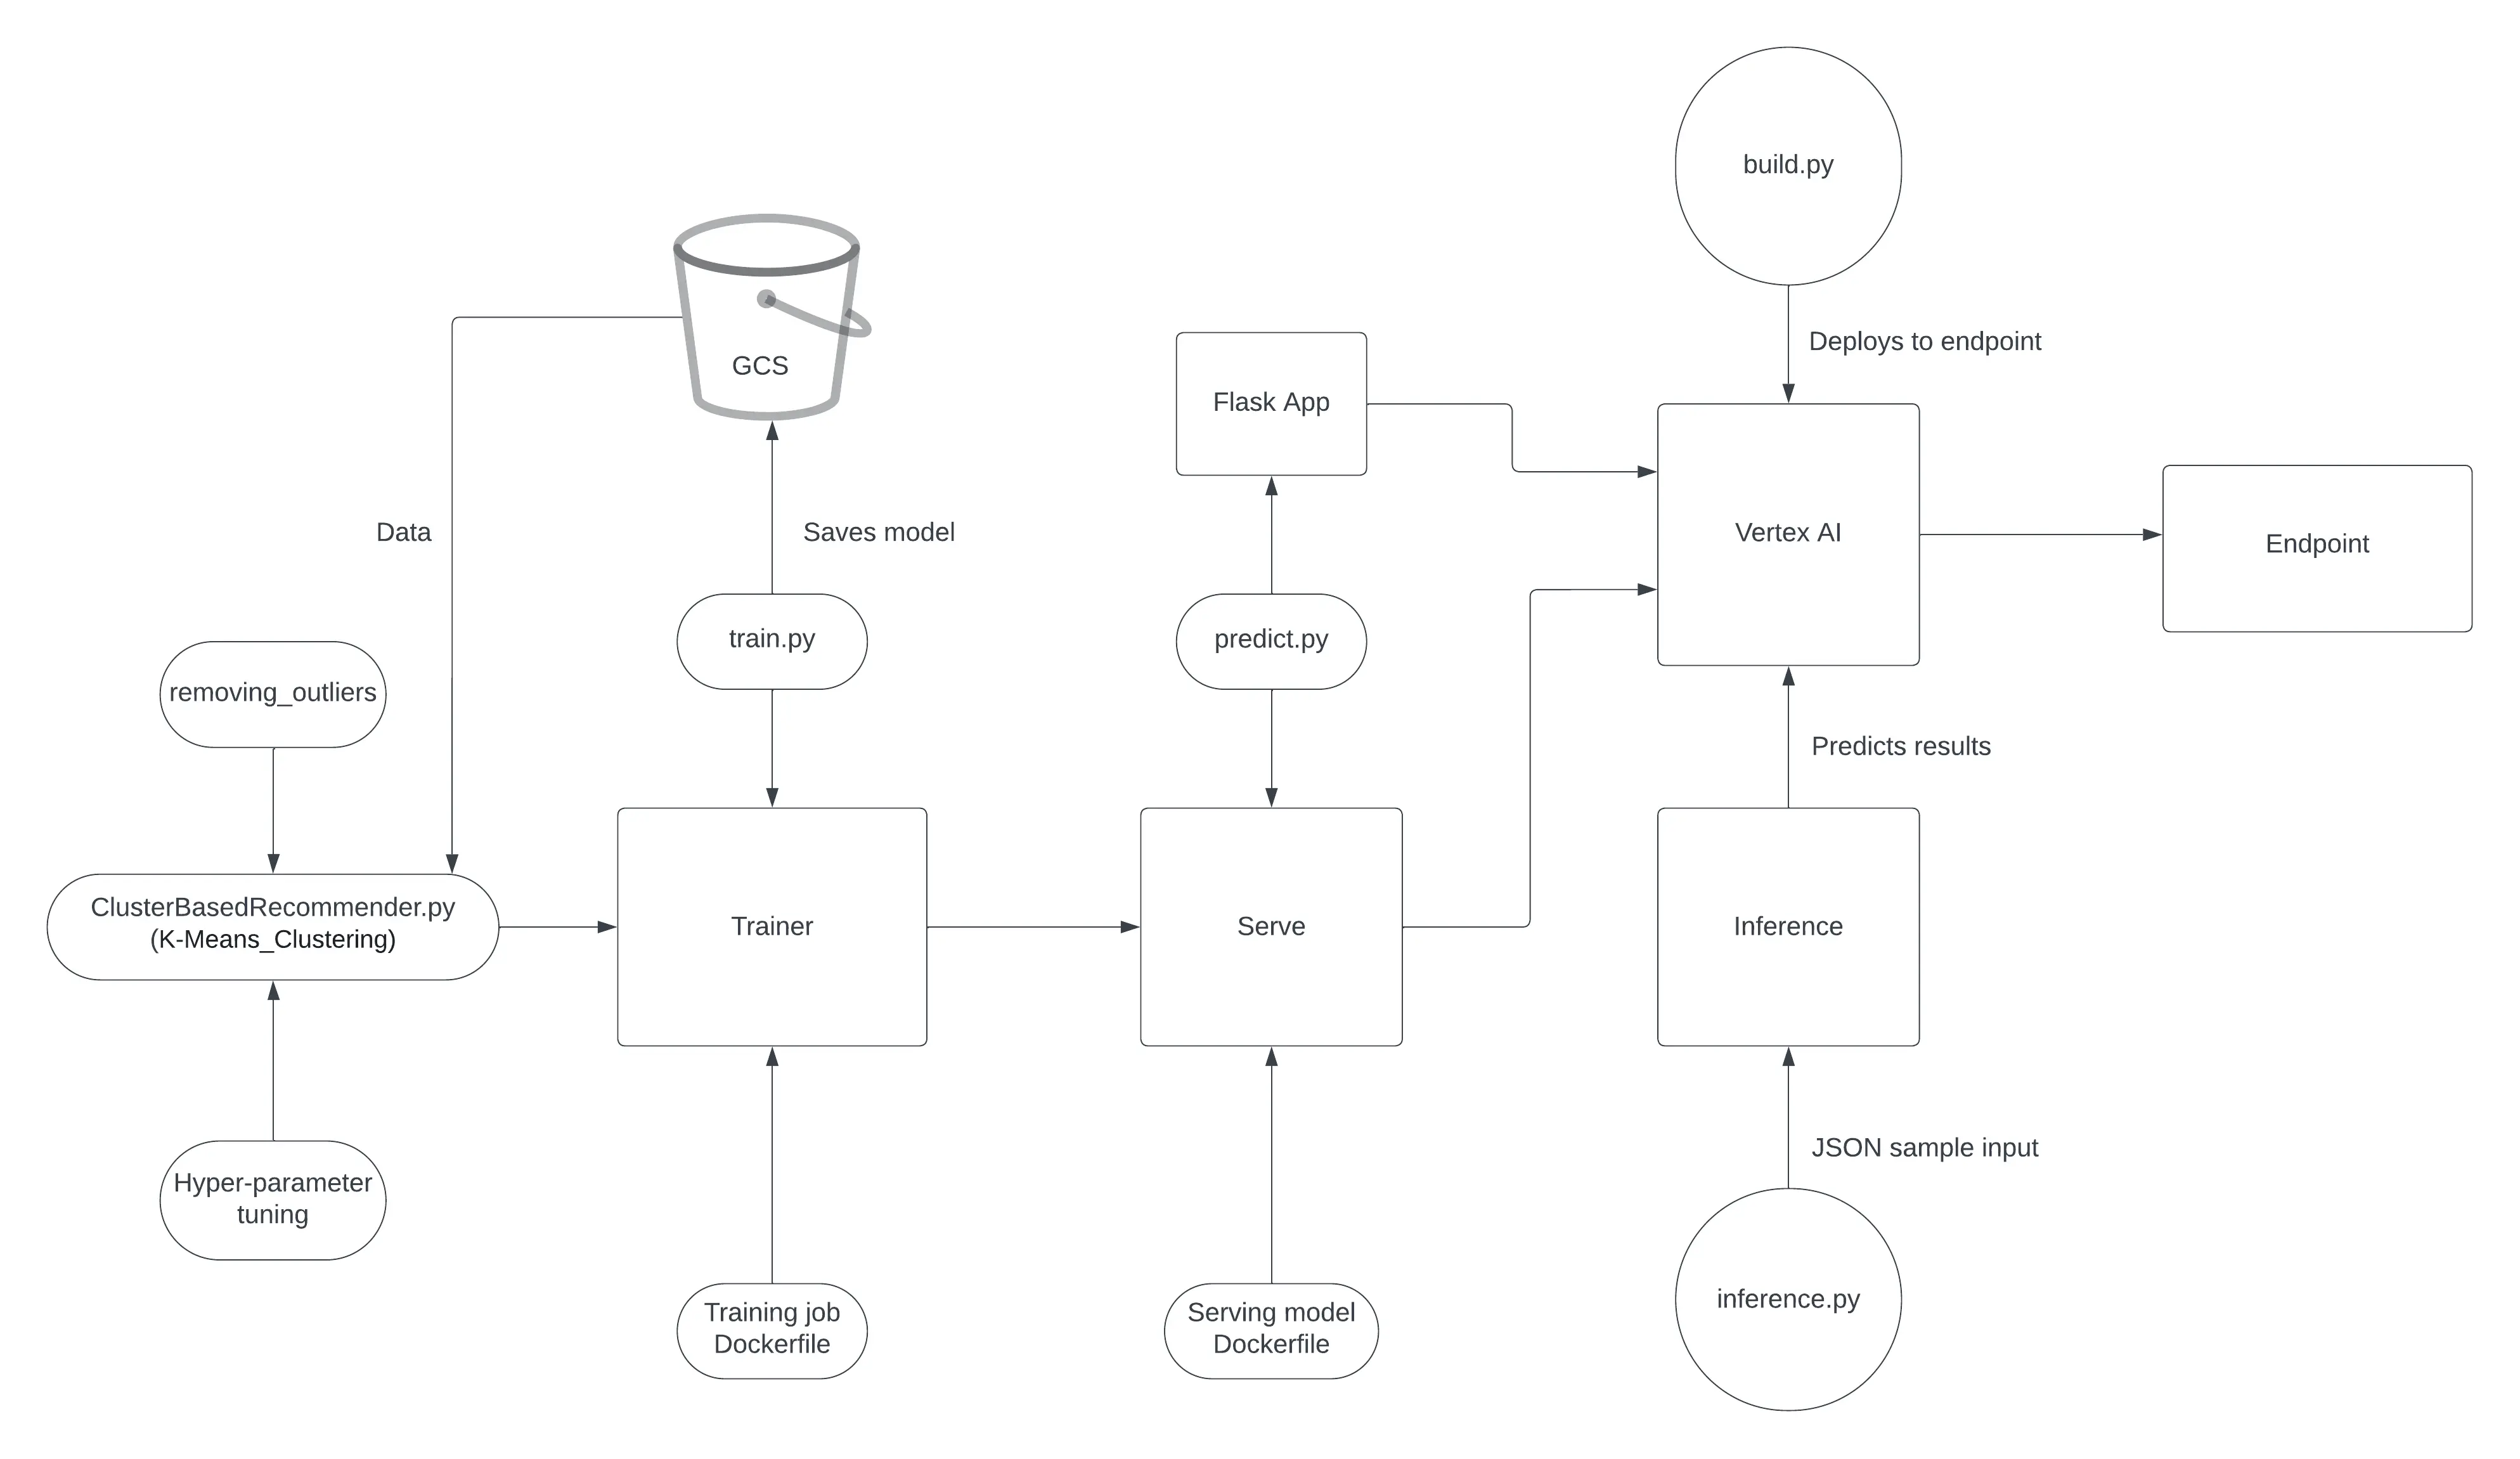
1.4 Script for Automating actions on GCP
build.py: Will create a training job using the images from the above trainer and serve in Vertex AI. At the end of the job it will automatically deploy the latest trained model to the endpoint for serving and making predictions. Link
1.4.1 Setup for Building and Pushing Train Image:
Navigate to your src folder and run the following commands at Commandline:
    docker build -f trainer/Dockerfile -t us-east1-
    docker.pkg.dev/[YOUR_PROJECT_ID]/[FOLDER_NAME]/trainer:v1 .
    docker push us-east1-docker.pkg.dev/[YOUR_PROJECT_ID]/[FOLDER_NAME]/trainer:v1
1.4.2 Setup for Building and Pushing Serve Image:
Navigate to your src folder and run the following commands at Commandline:
    docker build -f serve/Dockerfile -t us-east1-
    docker.pkg.dev/[YOUR_PROJECT_ID]/[FOLDER_NAME]/serve:v1 .
    docker push us-east1-docker.pkg.dev/[YOUR_PROJECT_ID]/[FOLDER_NAME]/serve:v1
1.5 Creating a separate script for online prediction
Once the model is deployed to an endpoint, the inference.py script generates predictions from the model. The predict_custom_trained_model function serves as a REST API endpoint, to obtain predictions by sending the insta nce data. This function constructs a prediction request tailored to the model’s expected input schema and transmits it to the deployed model on Vertex AI for it to create a prediction.
inference.py: It will send a json input to the model to predict the results. Link
1.5.1 Setup of Flask API for incoming requests
- Check if the the Configuration parameters are as per your project setup on Google Cloud Platform.
- This file should also contain commands/mechanisms to check the endpoint health, autoscaling for multiple instance predictions, etc.
Image: Online Inference for Direct Endpoint Requests

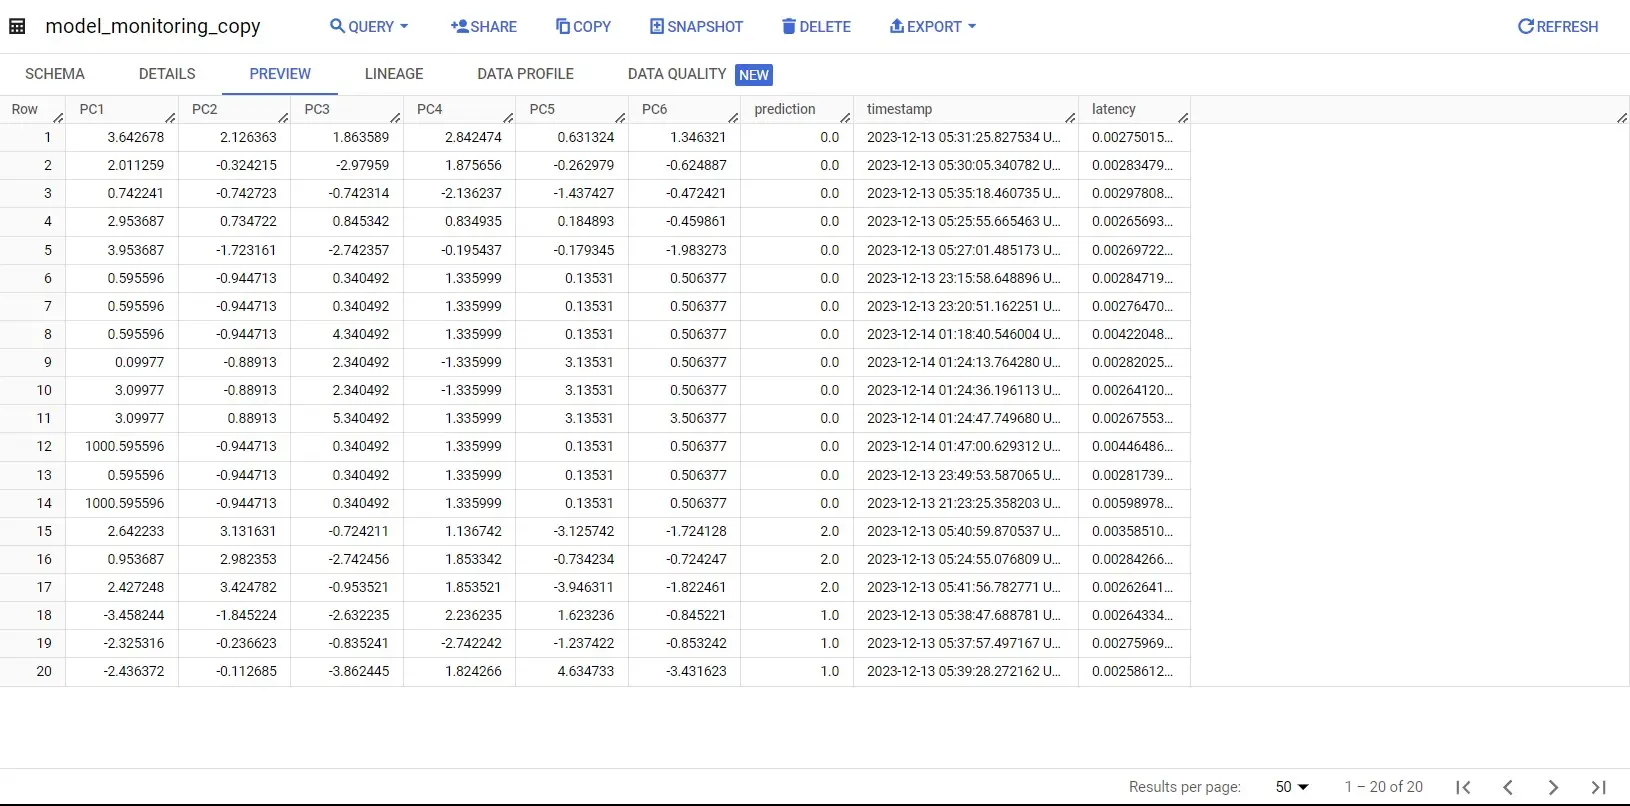
2. Developing BigQuery Table for Data Insights
We use BigQuery tables for infering the prediction data characteristics with respect to training-data characteristics like min-max values. Moreover, we also use these tables for monitoring the response latency during prediction at serving endpoint.
Image: Big Query Table Snippet
2.1 Setup for BigQuery Table:
- Go to the BigQuery Console. Ensure that you are working within the correct Google Cloud project.
- In the left navigation pane, select the dataset fot the table. Within the dataset, click on the “Create Table” button.
- Configure the table and fill the options:
- Table name: Enter a unique name for your table.
- Schema: Define the schema by specifying the column names, data types, and mode (nullable or required) for each column.
- Table Type: Choose the appropriate table type, such as “Native table” or “External table.”
- Source Data: If you are creating an external table, provide the source data details (e.g., Cloud Storage URI).
- You may additionally configure Advanced Options(Clustering, Table Expiration, etc.), if needed.
- Review and create the Table.
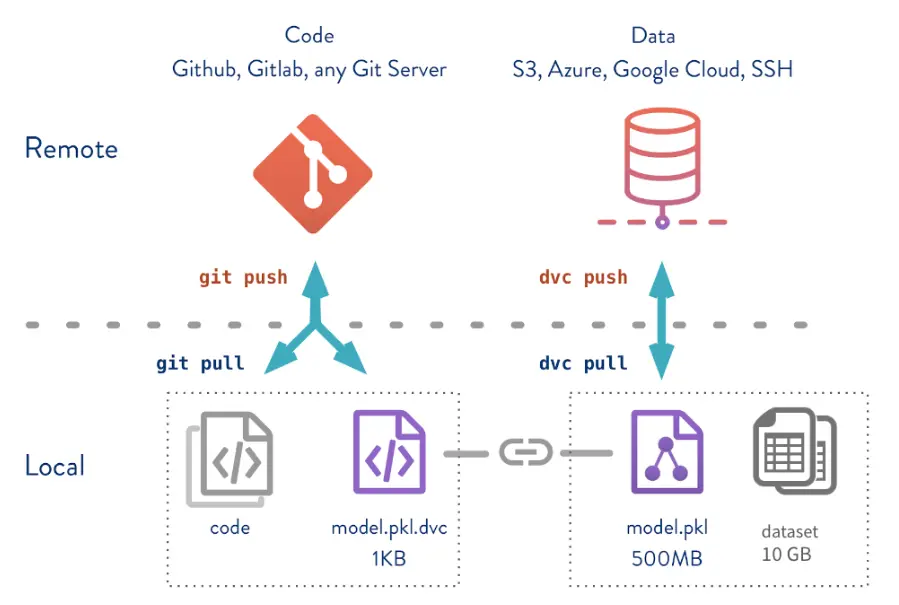
3. Data Versioning using dvc and Google Cloud Storage
Image: DVC Working
3.1 Setup for dvc:
- Ensure you have DVC with Google Cloud support installed on your system by using the following command:
pip install dvc[gs] - Create a new bucket by following instructions in point 2 in Section-A of Deployment. Then, replace
in command below with your bucket-name. dvc remote add -d myremote gs://<mybucket>**OR** To follow a folder structure, add the folder location as default to your remote bucket. ```python dvc remote add -d myremote gs://<yourbucket>/<folderpath> ``` - Download the json token for your bucket and save it at a secure location.
- Don’t forget to modify your credentials.
dvc remote modify --<remote-name> credentialpath <YOUR JSON TOKEN PATH> - Goto the parent directory of your local repository, then initialize dvc.
dvc init - Verify that a .dvc folder is created in the parent directory. Your .dvc file config metadata will look something like this
[core] remote = <remote-name> ['remote "remote-name"'] url = gs://<remote-name> - DVC commands are similar to git commands. To add the files under dvc tracking, use command:
dvc add <folderpath>/<filepath>
Image: DVC demo of local files under our project