Table of Contents
- Introduction
- Scoping
- Data
- Modeling
- Deployment
- Monitoring
1. Deployment on Google Cloud Platform
Deploying on Google Cloud Platform (GCP) leverages its robust, scalable infrastructure to manage and deploy applications efficiently. The process involves several steps to ensure smooth operation and integration of various GCP services.
1.1 Initial Google Cloud Configuration
The initial setup includes configuring the gcloud command-line tool, setting up project IDs, and configuring authentication to allow seamless interaction with GCP services.
1.1.1 Setup for Google Cloud (gcloud)
- Download the Google Cloud SDK
- Extract the tar.gz file into your directory which would create a folder named “google-cloud-sdk”
- Navigate to the folder, and execute the following command:
./google-cloud-sdk/install.sh - This should begin the SDK installation and you may come across the following prompts:
Do you want to help improve the Google Cloud CLI (y/N)? y Modify profile to update your $PATH and enable shell command completion? Do you want to continue (Y/n)? Y - Now it will prompt you set the path for the bashrc file as:
Enter a path to an rc file to update, or leave blank to use [/Users/debanjansaha/.zshrc]: Do not have to enter anything here, just press enter and continue - Then it will ask you whether you want to install Python 3.11 for best compatibility. It is upto you to decide whether you want to install it or not. I personally preferred version 3.10, so I did not install it.
- Finally, you have to configure your installation by executing the following commands:
- For Windows Users:
source ./google-cloud-sdk/path.bash.inc source ./google-cloud-sdk/completion.bash.inc - For Mac Users:
source ./google-cloud-sdk/path.zsh.inc
source ./google-cloud-sdk/completion.zsh.inc
- For Windows Users:
- Go to your home directory for me it is
/Users/debanjansahaand create a new file calledpath.zsh.incand add the following lines to your file:script_link="$( readlink "$0" )" || script_link="$0" apparent_sdk_dir="${script_link%/*}" if [ "$apparent_sdk_dir" == "$script_link" ]; then apparent_sdk_dir=. fi sdk_dir="$( cd -P "$apparent_sdk_dir" && pwd -P )" bin_path="$sdk_dir/bin" export PATH=$bin_path:$PATH
That’s it! You can now access the gcloud CLI. Check your installation by running the following command:
gcloud --version which will show that you have the following configuration set up:
- Google Cloud SDK 462.0.1
- bq 2.0.101
- core 2024.01.31
- gcloud-crc32c 1.0.0
- gsutil 5.27
1.1.2 Setup for Identity Access Management (IAM)
In order to work properly, you will need to setup a lot of access rights, which are critical for the project. Firstly, you need to ensure that all your project members should be able to access your project such that everyone can collaborate together.
- Step up a new project in GCP
- Create a Service Account: Go to IAM & Admin > Service Account -> create a service account.
- Grant Access -> Add Principals -> enter the email ids of the people you want to add to the project
- Assign Roles -> Provide access to the roles the user should be allowed to impersonate. While assigning roles, it is a best practice to always provide the least amount of access, and slowly adding more roles as per need.
- If you want to provide the user with admin/ownership rights to the entire project, provide the following access: Project -> Owner or Editor
- Add the following Google Provided roles to your service account
- Compute Engine Service Agent
- Google APIs Service Agent
- Cloud Composer Service Agent
- Kubernetes Engine Service Agent
- Cloud Dataflow Service Account
- AI Platform Custom Code Service Agent
- AI Platform Service Agent
- Cloud Build Service Agent
- Cloud AI Platform Notebooks Service Account
- Cloud Pub/Sub Service Account
- Google Cloud Run Service Agent
1.1.3. Setup for Cloud Storage
In order to store your data files, you will need to setup a storage service on GCP, preferably Google Cloud Storage (GCS) which provides you infinite storage in the form of “buckets”. Make sure you are in the correct project, and navigate to Cloud Storage -> Buckets, and create the following buckets which shall be used for this project. In this example, we shall be using only Multi-Regional buckets meaning the data will be replicated across multiple Regions, and if one of the region(s) goes down or the data goes corrupt, we will not be affected, and the data will be available in other regions. This setup ensures High-Availability (HA).
We shall be creating the following buckets for our project:
artifacts-speech-emotion: This will be our main bucket, which will contain all the data and the artifacts used and saved in the project from the various stages of the project.metadata-store-bucket: This bucket will contain metadata filestrain-bucket-model: This bucket will contain the metadata for files to be used during the current training phasetest-bucket-model: This bucket will contain the metadata for files to be used during evaluation phase In addition to all these buckets, GCP services will create more buckets at the runtime of various services involved for the project.
Inside our main bucket: artifacts-speech-emotion, we will store the data from the various stages in the following folder structure:
data_ingestion: this folder will contain the raw data ingested in batchesdata _transformation: this folder will contain the transformed data from preprocessingdata_validation: this folder will contain the results from the validation stepsmodel_training: this folder will contain the training artifacts, such as the scaler, encoder, training objects (model protobuf files, fingerprints), etcmodel_evaluation: this folder will contain objects from the model evaluation such as an image of the confusion matrix of each experiment run, etc.
1.1.4. Setup for environment
Environment setup involves creating virtual environments and setting environment variables that are crucial for accessing GCP resources securely. Here it is important to note, that we need to create service account access keys for the services to impersonate the service account access rights.
In order to create the access key: Go to IAM & Admin -> Service Account -> click on the three dots on the right of the service account -> Manage keys -> Add key -> Create new key (JSON).
This will create a new service account access key, which we shall rename as “gcp-key.json” and reference as such from henceforth.
NOTE: this service account key contains the information of your project and GCP account, and should never be uploaded into public websites or repositories like GitHub. As a best practice, you should always add the relative path to this access key in your gitignore file.
Once the access key is ready, you will need to configure your terminal to use this service key and gcloud to access the resources via CLI. In order to do so you will need to issue a couple of commands.
- Authenticate gcloud in your browser
gcloud auth login - Configure the project into gcloud
gcloud config set project <project-id> - Authenticate Docker to use gcloud for authentication
gcloud auth configure-docker us-east1-docker.pkg.dev - Impersonate the access in the service account access key
gcloud auth activate-service-account --key-file=gcp-key.json
Finally, apart from these, we shall be using various environment files (.env) files for each container. These are essentially secrets we do not want to hardcode into our project, and it offers flexibility to change these in accordance to your project. We have included an example.env file with each container code, so that you know what environment variables needs to be set and where.
For example, one our environment files looks like the below:
GOOGLE_CLOUD_PROJECT= Here you insert your google cloud project idAIPLATFORM_LOCATION= Here you insert the location of your Vertex AI clusterGCP_CREDENTIAL_PATH= Here you provide the relative path for your gcp-key.json fileSERVING_CONTAINER_URI= Here you provide the path for the serving containerAIPLATFORM_EXPERIMENT= Here you provide the experiment nameAIPLATFORM_BUCKET= Here you provide the artifact bucket path
1.2 Training Scripts
We used deep learning techniques such as Convolutional Neural Nets (CNNs) and Recurrent Neural Nets (RNNs) to train our models. The model takes the transformed numerical data as input and classifies it into one of seven output emotion categories. The parameters for the model are read from a params.yaml file which basically contains values for the batch size, number of filters, kernel size, max pooling, dropout rate. These parameters are obtained through hyper-parameter tuning using Optuna, and the parameters are overwritten when a better set of parameters are obtained from the hyper-parameter tuning step. The trigger for hyper-parameter tuning and the number of epochs for model training/retraining are dynamically controlled from the Composer DAG triggering the model training.
The entire training is controlled using the following scripts:
main.py: This is the main function of the container, which basically initializes the configuration manager to get the configuration objects, and finally invokes the training module.model_trainer.py: this basically contains the model training, retraining, logging artifacts, along with codes for hyperparameter tuning using Optuna.
There are a couple of utility files which controls various other parameters such as:
config_entity.py: dataclass object containing configurations and other pathsconfiguration.py: basically creates a configuration object to be used during model traininglogger.py: contains a logger object used for logging.utils.py: contains utility codes.
1.2.1. Setup for Training
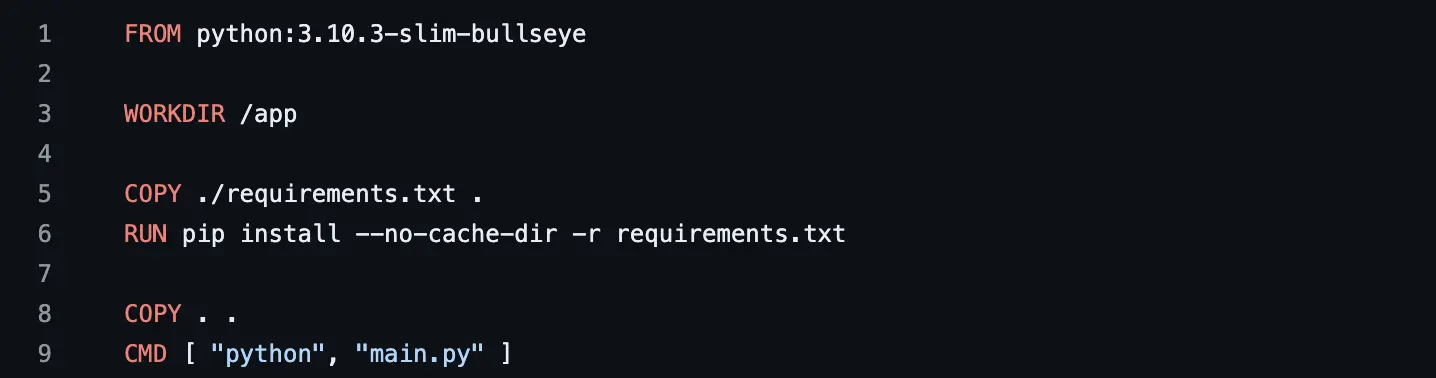
The code base for model training is Dockerized into a container using the Dockerfile:

Next we need to create an Artifacts Registry repository to version control our container images. This can be done using the command:
gcloud artifacts repositories create model-training --repository-format=docker \
--location=us-east1 --description="Docker repository for model training"
The containers are then pushed into Artifacts Registry using the bash script: gcr_model_train.sh, which basically contains the below commands:
- Change directory into the training codes
cd model_training - Build the docker container and tag it appropriately
docker buildx build -t model_train_img --platform linux/amd64 .` docker tag model_train_img us-east1-docker.pkg.dev/<project id>/model-training/model_train_img:staging - Push the container into Artifacts Registry
docker push us-east1-docker.pkg.dev/<project id>/model-training/model_train_img:staging
1.2.2. Trigger for Model Training
The model training is triggered as a Vertex AI Custom Training Job from the Cloud Composer (Airflow) DAG as:
    custom_container_training_job = CreateCustomContainerTrainingJobOperator(
        task_id="speech-model-training",
        staging_bucket=os.getenv('GCP_STAGING_BUCKET'),
        display_name='Model-Training',
        container_uri=os.getenv('VERTEXAI_TRAIN_CONTAINER_URI'),
        # model_serving_container_image_uri=MODEL_SERVING_CONTAINER_URI,
        # run params
        region=os.getenv('VERTEXAI_JOB_LOCATION'),
        project_id=os.getenv('GOOGLE_CLOUD_PROJECT'),
    )

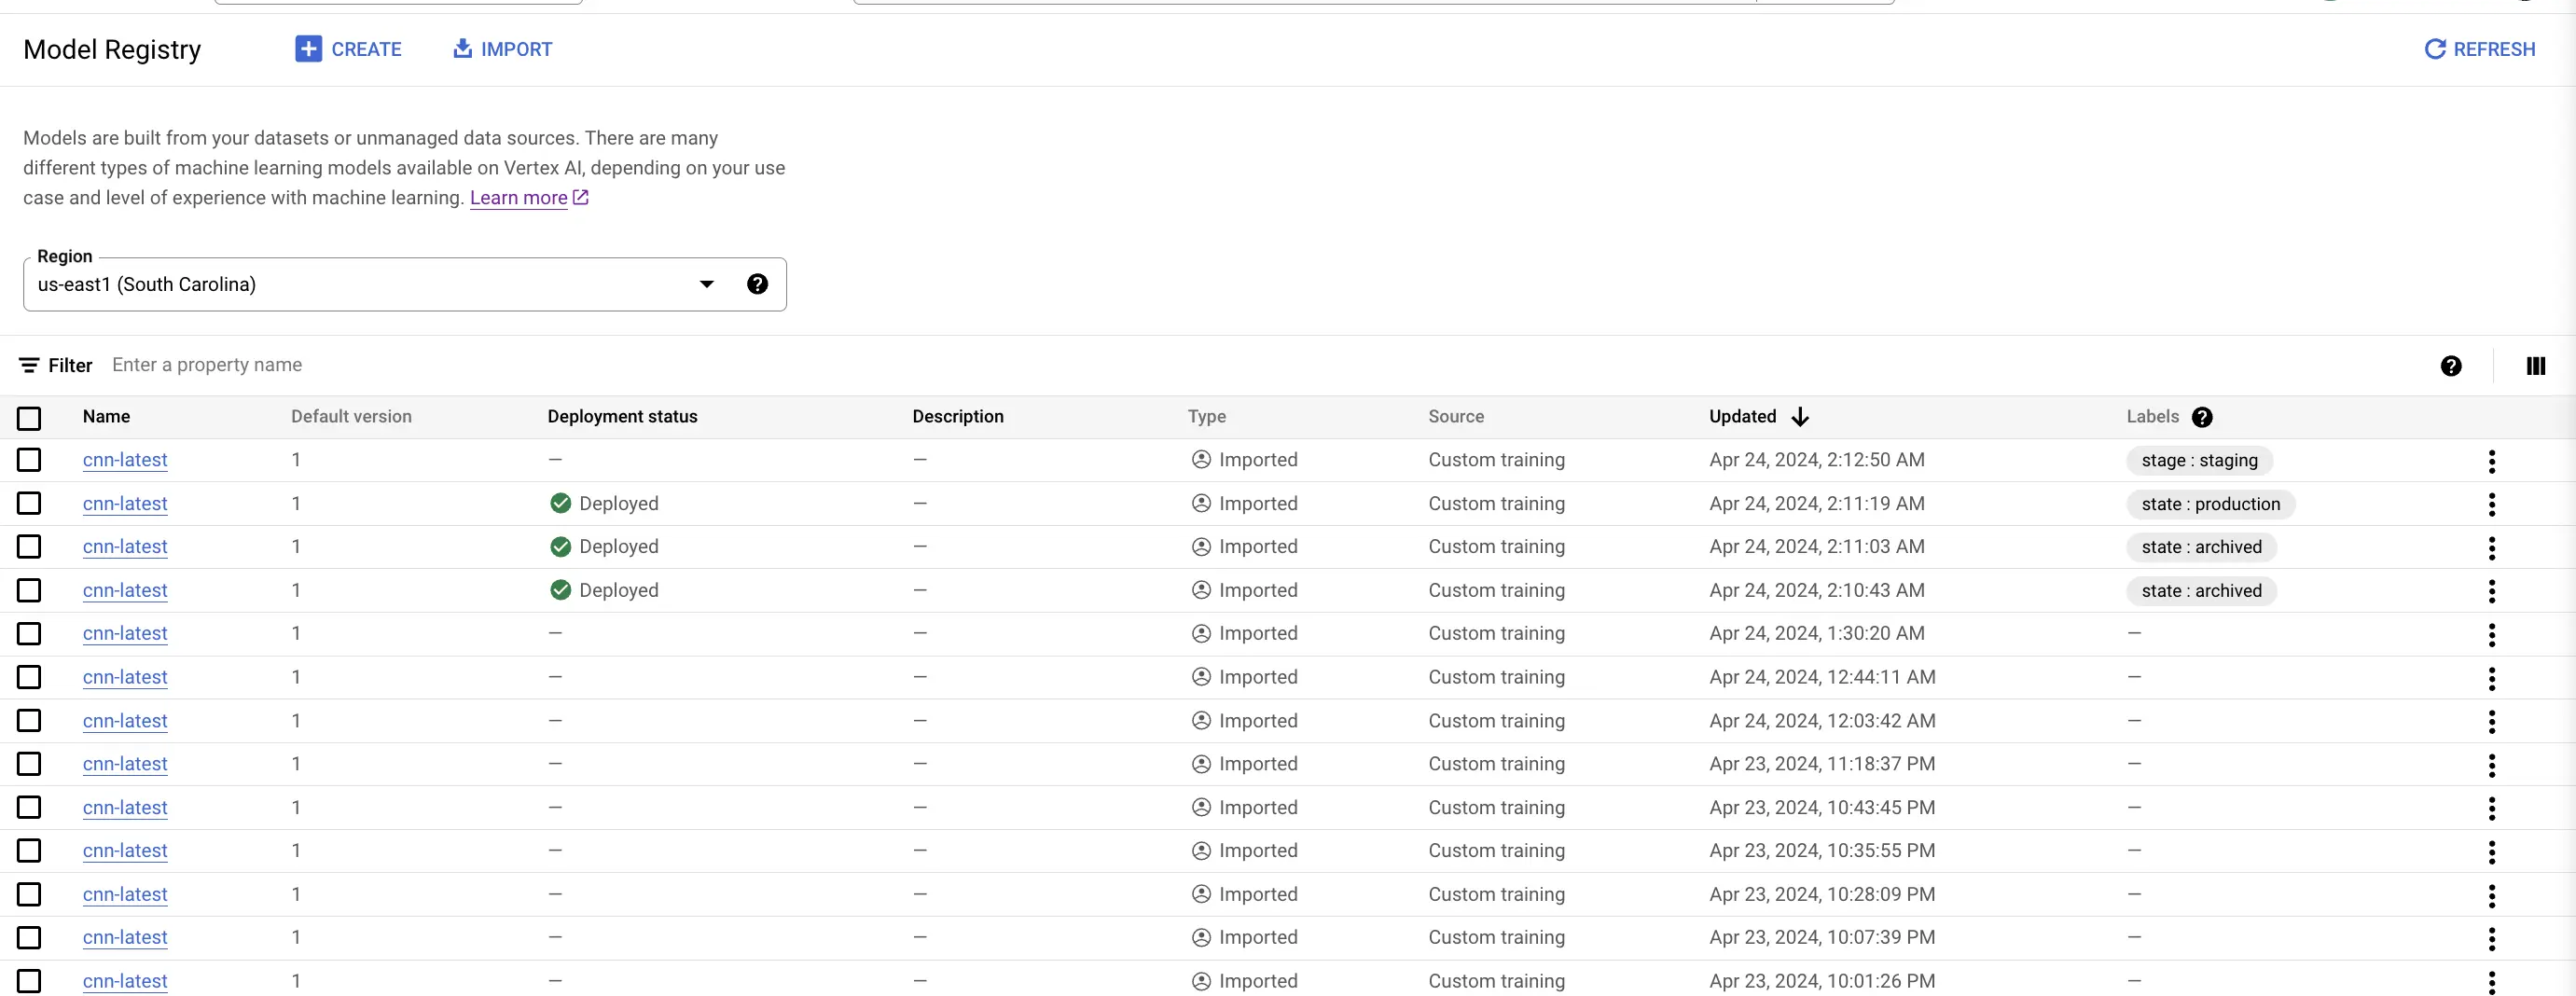
1.2.3. Training Experiment Tracking
We track the model experiments using the parameters and metrics which we log into the Vertex AI Model Registry. Below is a screenshot, where we compare the training results from multiple experiments to determine which one is a better experiment.
![]()
1.3 Evaluation Scripts
We evaluate the trained models using our Vertex AI Custom Training container for model evaluation. Since this is a classification task, we evaluate the performance of our models using standard classification metrics such as accuracy, precision, recall, f1-score and Matthews Correlation Coefficient (MCC). In addition to the above metrics, we also compute the confusion matrix and store it as an image in the artifacts bucket, as it is not possible to directly log an image as an artifact into Vertex AI. For the rest of the parameters, we log them directly into Vertex AI as a parameter or metric for evaluation.
Finally, the last step of the evaluation registers the model into Vertex AI Model Registry, and can be tagged, labeled, maintained very easily.
The scripts handling the model evaluation are as below:
main.py: This is the main function of the container, which basically initializes the configuration manager to get the configuration objects, and finally invokes the evaluation module.model_evaluator.py: this basically contains the model evaluation, logging parameters, artifacts, along with model registry codes.
There are a couple of utility files which controls various other parameters such as:
config_entity.py: dataclass object containing configurations and other pathsconfiguration.py: basically creates a configuration object to be used during model evaluationlogger.py: contains a logger object used for logging.utils.py: contains utility codes.
1.3.1 Setup for Evaluation:
The code base for model evaluation is Dockerized into a container using the Dockerfile:
Similar to model training, we need to create an Artifacts Registry repository to store our evaluation container image. This can be done using the command:
gcloud artifacts repositories create model-evaluation --repository-format=docker \
--location=us-east1 --description="Docker repository for model evaluation"
The containers are then pushed into Artifacts Registry using the bash script: gcr_model_eval.sh, which basically contains the below commands:
- Change directory into the training codes
cd model_evaluation - Build the docker container and tag it appropriately
docker buildx build -t model_eval_img --platform linux/amd64 . docker tag model_eval_img us-east1-docker.pkg.dev/<project id>/model-evaluation/model_eval_img:staging - Push the container into Artifacts Registry
docker push us-east1-docker.pkg.dev/<project id>/model-evaluation/model_eval_img:staging
1.3.2. Trigger for Model Evaluation
The model evaluation is triggered as a Vertex AI Custom Training Job from the Cloud Composer (Airflow) DAG as:
    custom_container_evaluation_job = CreateCustomContainerTrainingJobOperator(
        task_id="speech-model-evaluation",
        staging_bucket=os.getenv('GCP_STAGING_BUCKET'),
        display_name='Model-Evaluation',
        container_uri=os.getenv('VERTEXAI_EVAL_CONTAINER_URI'),
        # model_serving_container_image_uri=MODEL_SERVING_CONTAINER_URI,
        # run params
        region=os.getenv('VERTEXAI_JOB_LOCATION'),
        project_id=os.getenv('GOOGLE_CLOUD_PROJECT'),
    )
This task is triggered directly by the model training task.
1.3.3. Evaluation Experiment Tracking
We track the model experiments using the parameters and metrics which we log into the Vertex AI Model Registry. Below is a screenshot, where we compare the evaluation results from multiple experiments to determine which one is a better experiment.
![]()
1.4 Model Deployment
Deploying machine learning models involves configuring the deployment environment, setting up the necessary infrastructure, and automating the deployment process. This stage ensures that the models are efficiently transitioned from training to production. It involves creating scripts that handle the packaging of the model into Docker images, managing dependencies, and defining runtime configurations. These deployment configurations are meticulously planned to align with the scalability and security needs of production environments.
1.4.1 Setup for Deploying Models
The model deployment codes are dockerized into containers and deployed.
The scripts handling the model deployment are as below:
main.py: This is the main function of the container, which basically initializes the configuration manager to get the configuration objects, and finally invokes the deployment module.deployment.py: This is the main module which handles the deployment by creating a Vertex AI endpoint for the model if no existing endpoint exists, or reusing an existing deployment endpoint. Once, the training and evaluation of a model is completed, and the model meets the satisfactory criteria to be deployed into production, we trigger this deployment task, which fetches the endpoint, gets the most recent model, or it can also fetch some specific model id and deploy it into the endpoint.
This process is time-consuming and is prone to failures due to unforeseen reasons, an alternative to this would also involve deploying the model directly from the Vertex AI management console. It is recommended to retry the deployment steps again in case there are failures.
In practice, we have demonstrated the use of canary deployment techniques where we have deployed two different models, by splitting the traffic into 90:10 ratio and gradually increasing the traffic to the most recently deployed model. Once a model is deployed to the endpoint, we can very easily control the percentage of traffic being allocated to that model. As with the other steps, there are a couple of utility files which control various other parameters.
1.5 Model Serving
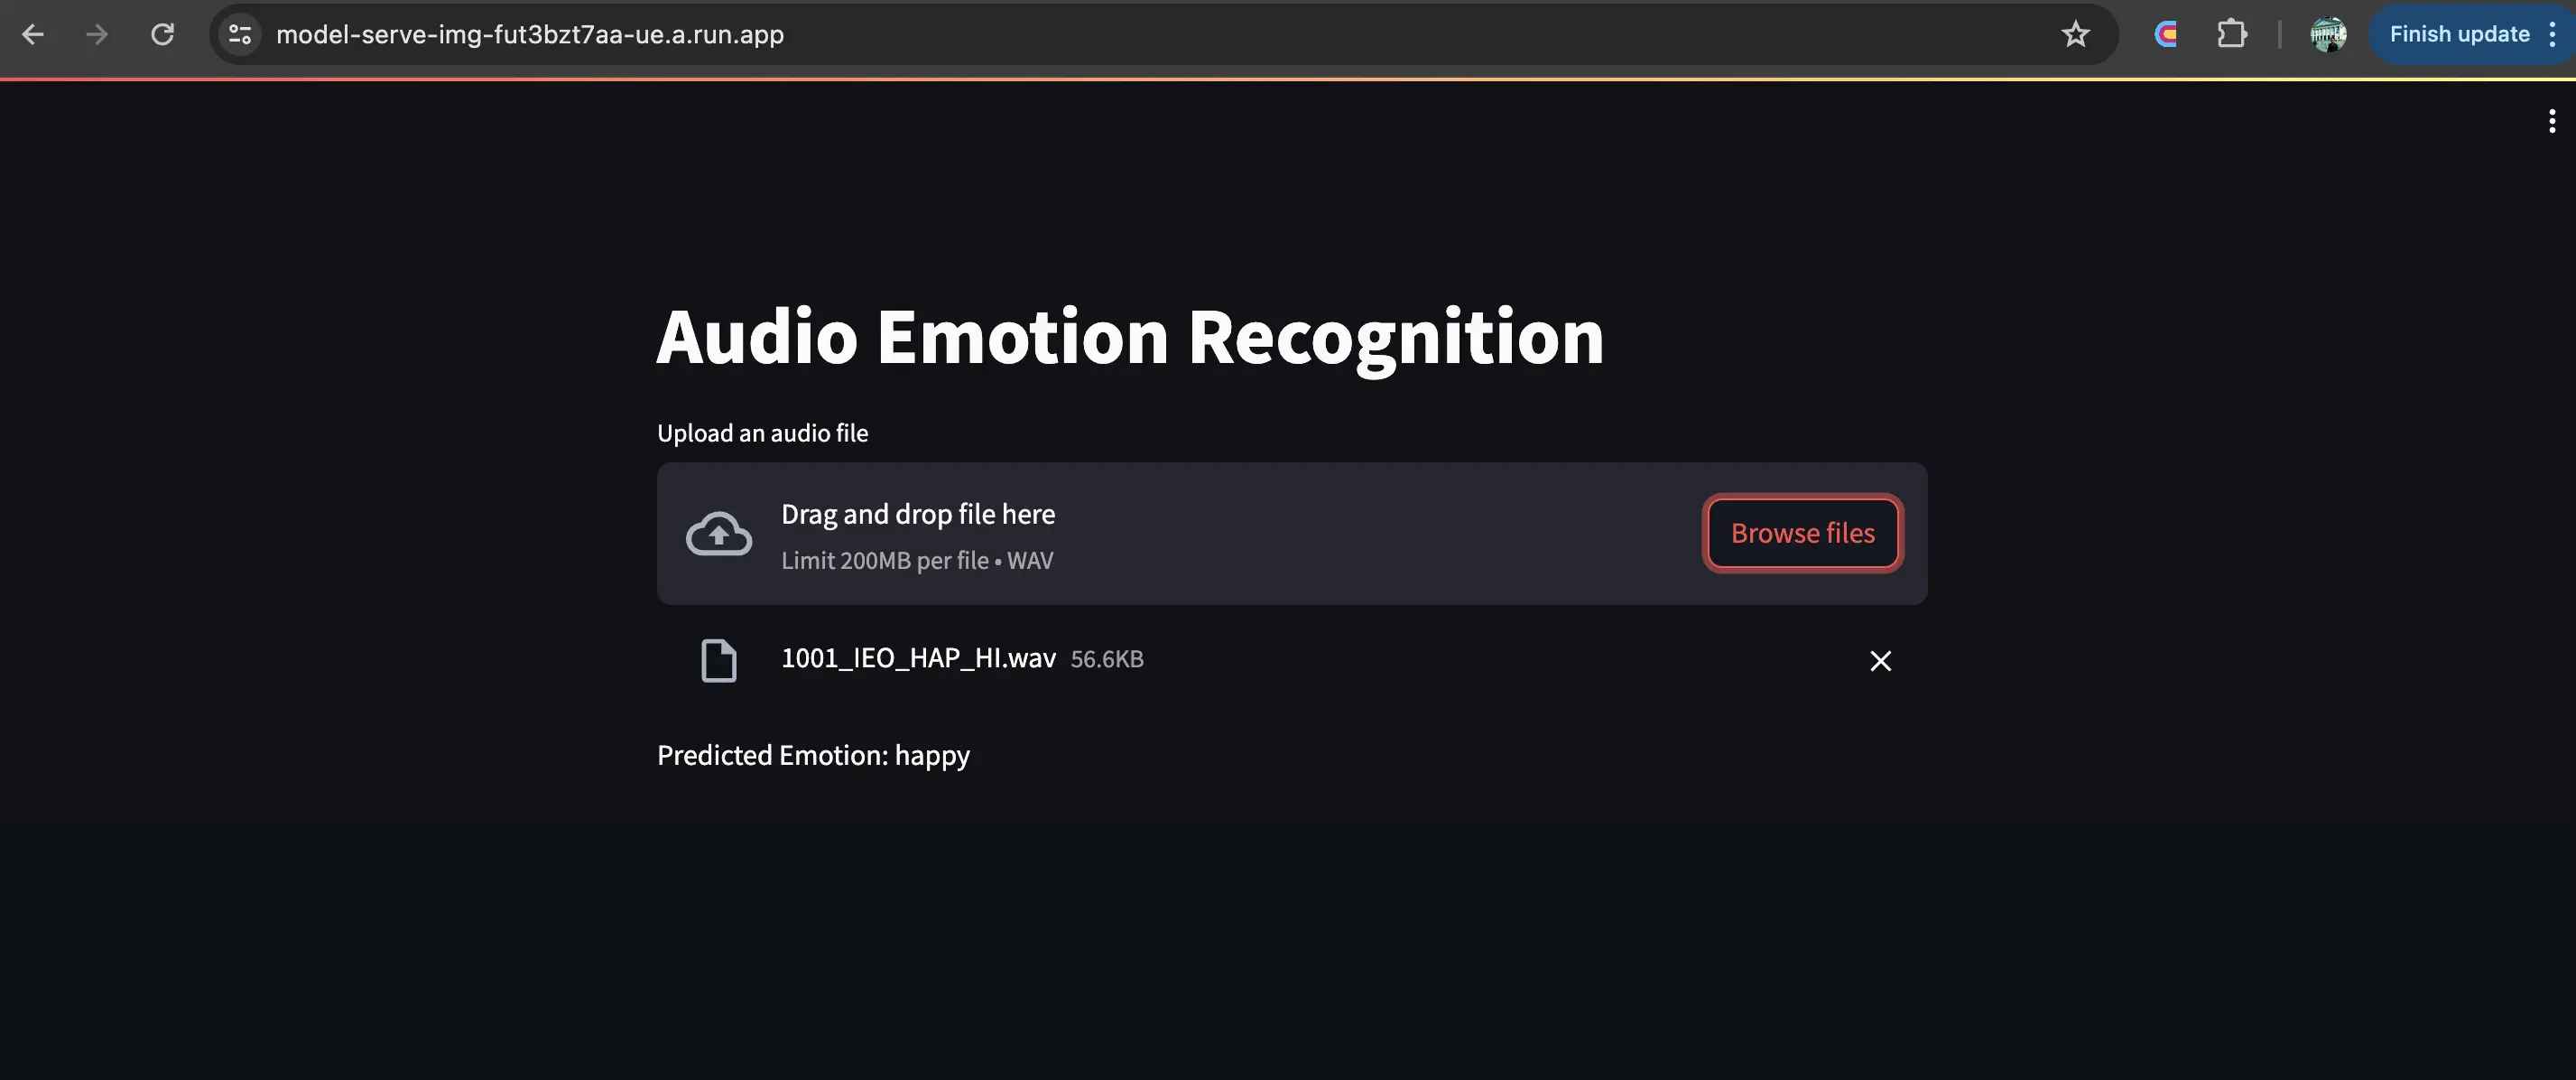
For model serving, a user-friendly interface is crucial. Streamlit is employed to develop interactive web applications that serve as the frontend for model inferencing. We have employed an online serving mechanism, where the user can upload a piece of audio file, and we transform the data and predict on it. The response from the prediction is formatted for the corresponding emotion and displayed on the frontend within mili-seconds. This approach not only enhances user engagement but also provides a practical avenue for real-world testing and feedback on the model’s performance.
1.5.1 Setup of Streamlit for incoming requests
The setup involves configuring Streamlit to handle incoming requests, displaying results, and providing an interactive user experience. This setup includes integrating the Streamlit app with backend services (Vertex AI prediction endpoint) that perform the actual model predictions, handling data input, and response formatting to provide real-time feedback to users.
The codes handling the model serving are:
main.py: This is the main function of the container, which basically reads the raw audio data, transforms the data to extract numeric features from the audio signal. Then using the deployment endpoint where the model is deployed, it performs the prediction step. Finally, it computes the resultant emotion class from the returned predictions and displays it on the screen.serving.py: This modules authenticates the request and fetches the model serving endpointdata_transformation.py: this module is a simplified version of our data transformation module where it only performs data transformation using the scaler and encoder object from the training step and converts the raw audio data into its numerical format.
As with the other steps, this module also uses a lot of utility codes and functions for handling configuration management and other utility functions.